
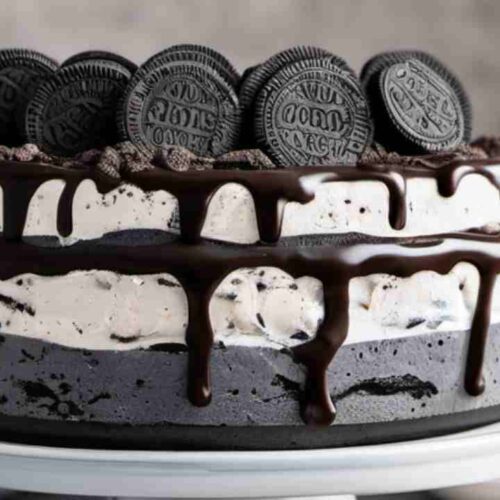
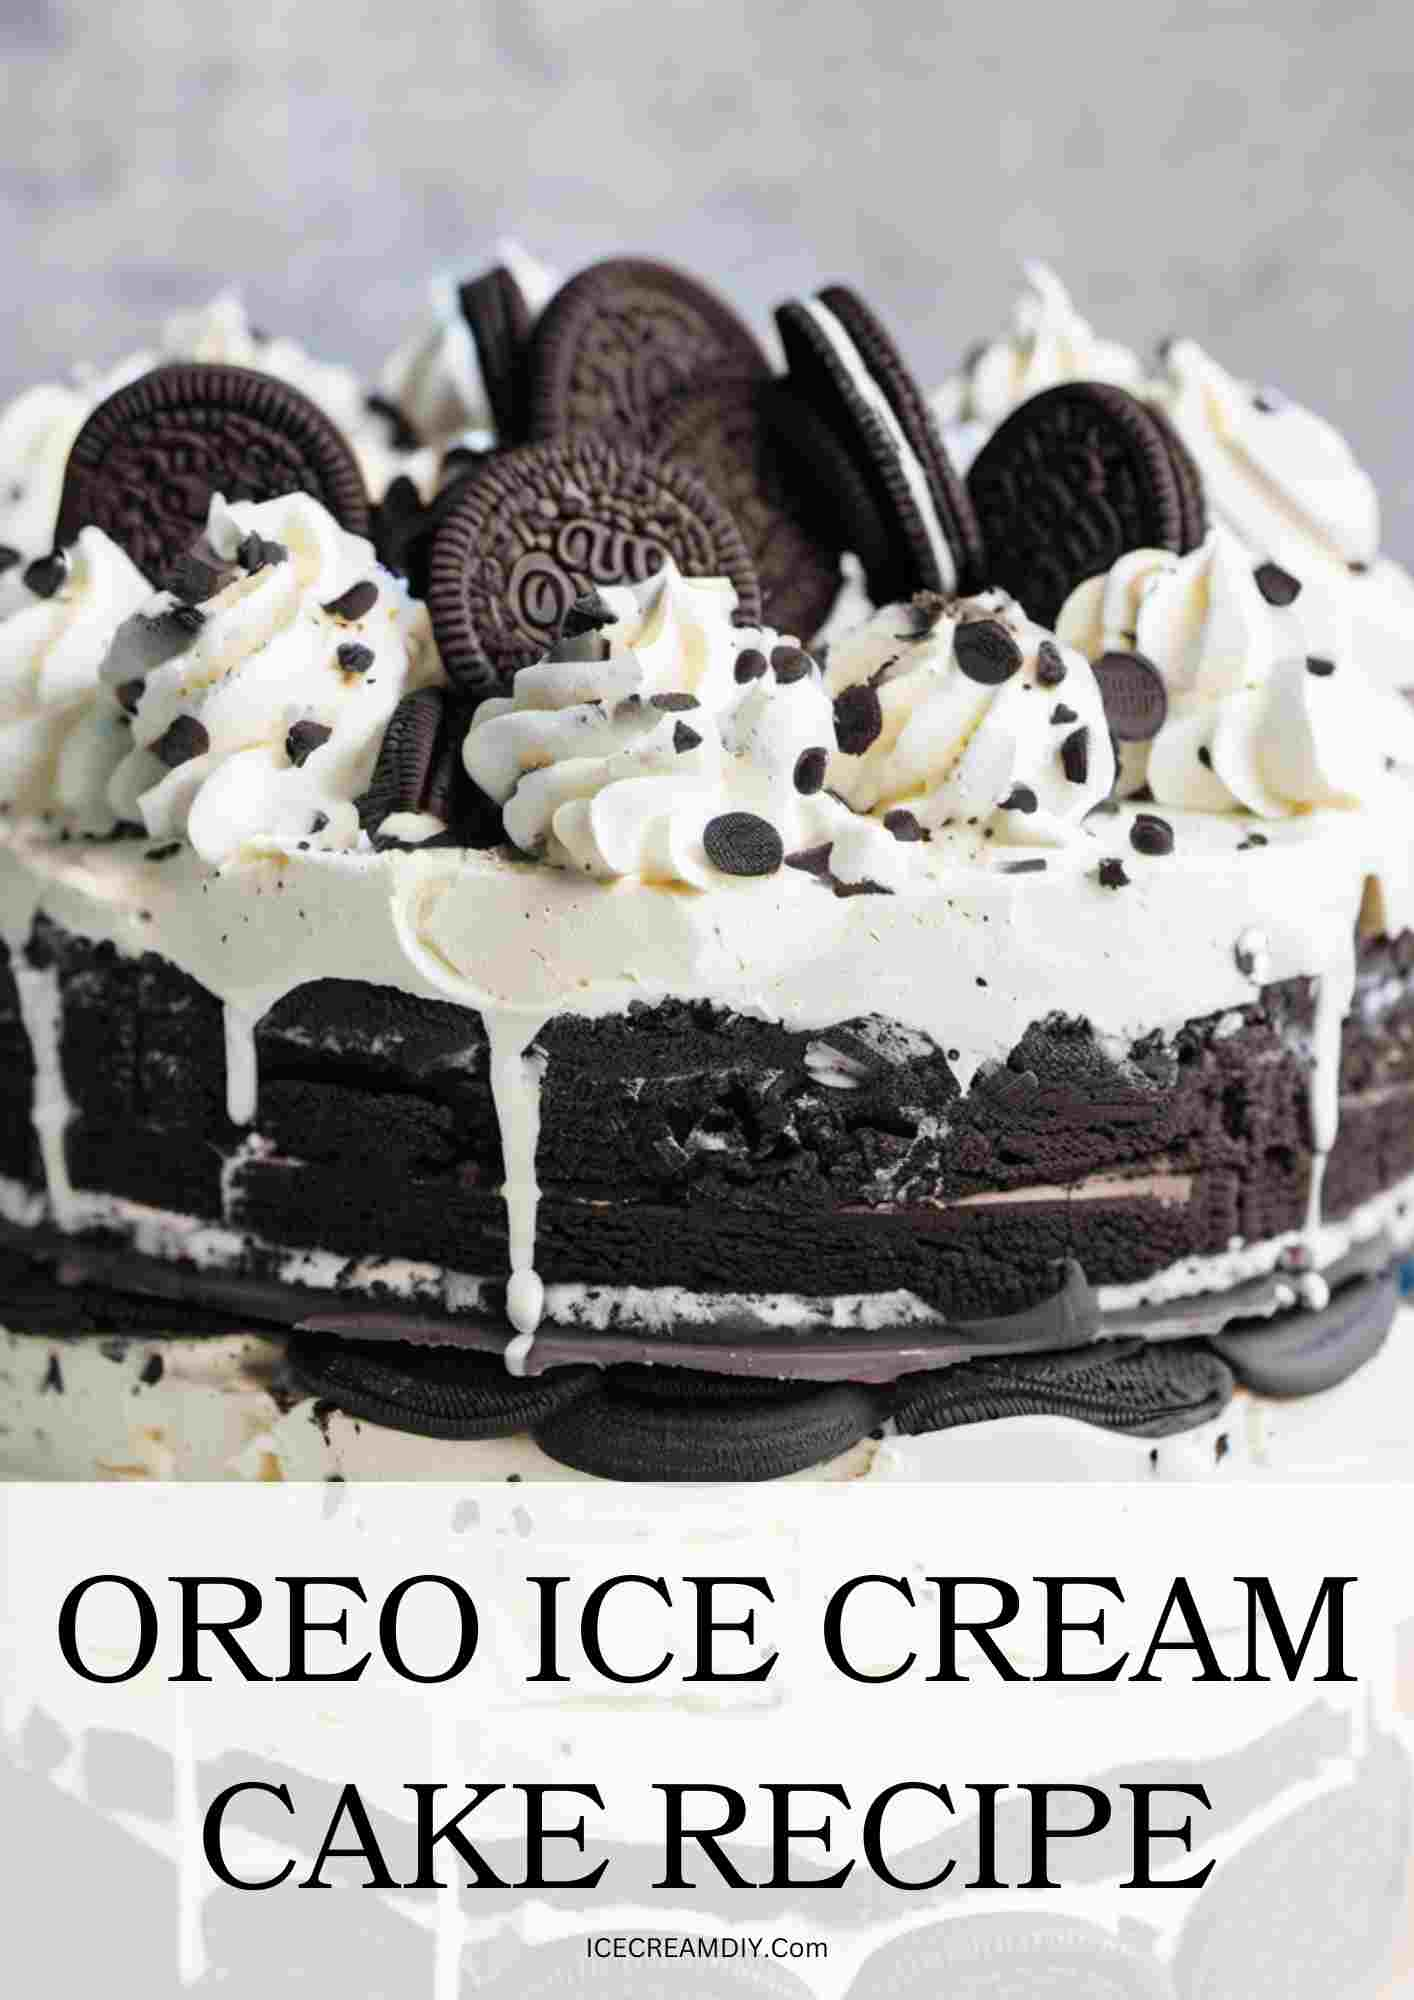
The Oreo Ice Cream Cake is a delightful, layered dessert that combines the rich flavors of Oreo cookies and creamy vanilla ice cream. This no-bake cake features a crunchy Oreo crust, smooth and fluffy ice cream layers, and additional crumbled Oreo cookies for an extra touch of indulgence. It’s a perfect treat for hot summer days, birthdays, or any special occasion when you need a cool, sweet, and satisfying dessert.
What makes the Homemade Oreo Ice Cream Cake so appealing is its irresistible combination of textures and flavors. The crunch of the Oreo crust, the creaminess of the ice cream, and the delightful Oreo bits in every bite create a symphony of taste and texture that is hard to resist. Making this cake at home also allows for customization – you can experiment with different ice cream flavors, add extra toppings, or adjust the sweetness to your preference.
Plus, it’s a crowd-pleaser that looks impressive and tastes even better, making it an excellent choice for entertaining guests.
Oreo Ice Cream Cake Recipe
Ingredients
For the Crust:
- 24 Oreo cookies, crushed
- 1/4 cup Melted butter
For the Ice Cream Layers:
- 2 cups Heavy Whipping cream
- 1 can sweetened condensed milk
- 1 teaspoon vanilla extract
- 1½ quarts vanilla ice cream, softened
- 15 Oreo cookies, crushed
Optional Toppings:
- Hot fudge sauce
- Whipped cream
- Additional crushed Oreos
Instructions
- Preparing the Oreo Crust:Crush the Oreos: Place 24 Oreo cookies in a food processor and pulse until finely crushed, or put them in a plastic bag and crush them with a rolling pin.Mix with melted butter: In a medium bowl, combine the crushed Oreos with melted butter until evenly coated.Press into pan: Press the mixture firmly into the bottom of a 9-inch springform pan to form an even crust. Chill in the refrigerator while you prepare the ice cream base.
- Making the Ice Cream Base:Whip the cream: In a large mixing bowl, use an electric mixer to whip the heavy cream until stiff peaks form.Combine with sweetened condensed milk: Gently fold the sweetened condensed milk and vanilla extract into the whipped cream until well combined.Add softened vanilla ice cream: Fold in the softened vanilla ice cream until the mixture is smooth and evenly combined.
- Assembling the Cake:First ice cream layer: Spread half of the ice cream mixture evenly over the chilled Oreo crust.Add crushed Oreos: Sprinkle half of the 15 crushed Oreos over the ice cream layer.Optional layer of hot fudge: Drizzle hot fudge sauce over the Oreo layer if desired.Second ice cream layer: Spread the remaining ice cream mixture evenly over the Oreo layer.Top with more crushed Oreos: Sprinkle the remaining crushed Oreos on top.
- Freezing the Cake:Cover with plastic wrap: Ensure the entire cake is well covered to prevent freezer burn.Freeze for at least 4 hours: For best results, freeze overnight to allow the cake to firm up completely.
- Serving the Cake:Remove from freezer: Let the cake sit at room temperature for a few minutes to make slicing easier.Release from springform pan: Carefully remove the sides of the springform pan.Slice and serve: Use a knife warmed in hot water for clean slices.Optional garnishes: Top each slice with whipped cream, a drizzle of hot fudge sauce, or additional crushed or whole Oreos if desired.
Notes
What is Oreo Ice Cream Cake Made of?
Oreo Ice Cream Cake is made of several key ingredients that come together to create a deliciously creamy and crunchy dessert. Here’s what you’ll need:
For the Crust:
- Oreo Cookies: Crushed to form the base layer of the cake.
- Melted Butter: Mixed with the crushed Oreos to help bind them together and create a firm crust.
For the Ice Cream Layers:
- Heavy Whipping Cream: Whipped to stiff peaks to add a rich, airy texture to the ice cream base.
- Sweetened Condensed Milk: Adds sweetness and a creamy consistency to the ice cream mixture.
- Vanilla Extract: Enhances the flavor of the ice cream base.
- Vanilla Ice Cream: Softened to easily mix with the other ingredients, creating a smooth and creamy layer.
- Additional Oreo Cookies: Crushed and layered within the ice cream to add texture and flavor.
Optional Toppings:
- Hot Fudge Sauce: Drizzled between layers or on top for extra chocolatey goodness.
- Whipped Cream: Added as a decorative and delicious finishing touch.
- Additional Crushed Oreos: Sprinkled on top for extra crunch and visual appeal.
These ingredients combine to make a layered dessert that’s both visually appealing and deliciously satisfying. The combination of creamy ice cream and crunchy Oreos makes this cake a standout treat for any occasion.
Why You’re Going to Love this Oreo Ice Cream Cake Recipe?
You’re going to love this Ice Cream Cake recipe for several reasons:
- Easy to Make: This Oreo Ice Cream Cake recipe is incredibly simple and straightforward. With no need for an ice cream maker or baking, it’s perfect for both novice and experienced home cooks. The easy-to-follow steps ensure you can create a delicious dessert with minimal effort.
- Crowd-Pleaser: The combination of rich, creamy ice cream and crunchy, chocolatey Oreos is a guaranteed hit. It’s a dessert that appeals to both kids and adults, making it perfect for family gatherings, birthday parties, or any special occasion. The familiar flavors of Oreos and ice cream are universally loved, ensuring everyone will enjoy a slice.
- Customizable: One of the best aspects of this recipe is its versatility. You can customize the cake with your favorite ice cream flavors, such as mint chocolate chip, cookies and cream, or even a fruity sorbet. You can also add different toppings and mix-ins like caramel sauce, chocolate chips, or nuts to create a unique dessert every time.
- No-Bake Convenience: This no-bake dessert is ideal for warm weather when you want to avoid turning on the oven. It’s also a great make-ahead option, allowing you to prepare it in advance and have a stunning dessert ready when you need it.
- Impressively Delicious: Despite its simplicity, this cake is impressive in both presentation and taste. The layered look with the contrasting colors of ice cream and Oreo crust makes it visually appealing, while the combination of creamy and crunchy textures creates a delightful eating experience.
With its ease of preparation, universal appeal, and endless customization options, this Oreo Ice Cream Cake recipe is a must-try. It’s the perfect way to enjoy a sweet, refreshing treat with minimal fuss and maximum enjoyment.
Ingredients for Oreo Ice Cream Cake
Here’s a breakdown of the ingredients you’ll need to make Cotton Candy Ice Creams:
Main Ingredients:
- Cotton Candy Flavoring or Extract: This is the star ingredient that gives the ice cream its signature cotton candy taste. You can find cotton candy flavoring or extract in stores or online.
- Heavy Cream: Provides the rich and creamy base for the ice cream, giving it a smooth texture.
- Sugar: Adds sweetness to the ice cream. You can adjust the amount of sugar based on your preference for sweetness.
- Milk: Whole milk works best for a creamy consistency, but you can also use low-fat milk if desired.
Optional Ingredients for Enhancements:
- Food Coloring: Pink and blue food coloring are commonly used to mimic the vibrant colors of cotton candy. You can adjust the intensity of the colors to your liking.
- Candy Sprinkles: Adding colorful candy sprinkles to the ice cream before freezing can enhance the visual appeal and add a fun texture.
These ingredients come together to create a delightful Cotton Candy Ice Creams that’s perfect for satisfying your sweet cravings and bringing a nostalgic flair to your dessert table.
Creating a delicious Oreo Ice Cream Cake at home is simpler than you might think, and it all starts with the right ingredients. Each component of this dessert plays a crucial role in delivering the perfect balance of creamy, crunchy, and sweet flavors. Let’s take a closer look at what you’ll need to make this delightful treat.
For the Crust:
- Oreo Cookies: You’ll need about 24 Oreo cookies. These will be crushed to form the base layer of your cake, providing a delightful crunch and rich chocolate flavor.
- Melted Butter: Use 1/4 cup (1/2 stick) of melted butter to mix with the crushed Oreos. This helps bind the crust together, ensuring it holds its shape when you cut the cake.
For the Ice Cream Layers:
- Heavy Whipping Cream: 2 cups of heavy whipping cream are whipped to stiff peaks. This adds a luxurious, airy texture to the ice cream base, making it extra creamy.
- Sweetened Condensed Milk: One can (14 ounces) of sweetened condensed milk brings sweetness and a creamy consistency to the mix, enhancing the overall flavor.
- Vanilla Extract: Add 1 teaspoon of vanilla extract to the ice cream base for a subtle, enhancing flavor.
- Vanilla Ice Cream: 1 1/2 quarts of softened vanilla ice cream are folded into the mixture. This provides the main body of the cake, making it rich and creamy.
- Additional Oreo Cookies: Crush about 15 more Oreo cookies to mix into the ice cream layers. This adds extra crunch and bursts of chocolatey goodness throughout the cake.
Optional Toppings:
- Hot Fudge Sauce: Drizzle hot fudge sauce between layers or on top of the cake for an extra dose of chocolate.
- Whipped Cream: Add whipped cream as a decorative and delicious finishing touch.
- Additional Crushed Oreos: Sprinkle more crushed Oreos on top for added crunch and visual appeal.
These ingredients come together to create a dessert that’s not only easy to prepare but also incredibly satisfying. The combination of creamy ice cream and crunchy Oreos ensures that every bite is a delightful treat.
Nutritional Information and Dietary Considerations
Assuming the Oreo Ice Cream Cake is divided into 12 servings, here is an approximate nutritional breakdown for each serving:
- Calories: 615
- Total Fat: 39g
- Saturated Fat: 23g
- Trans Fat: 0.5g
- Cholesterol: 110mg
- Sodium: 265mg
- Total Carbohydrates: 59g
- Dietary Fiber: 1g
- Sugars: 47g
- Protein: 6g
Nutritional Information (per serving, with optional toppings)
With the addition of optional toppings such as hot fudge sauce, whipped cream, and extra crushed Oreos, the nutritional values increase:
- Calories: 707
- Total Fat: 43g
- Saturated Fat: 26g
- Trans Fat: 0.5g
- Cholesterol: 125mg
- Sodium: 295mg
- Total Carbohydrates: 73g
- Dietary Fiber: 1g
- Sugars: 58g
- Protein: 7g
Dietary Considerations
High Caloric Content
Oreo Ice Cream Cake is a high-calorie dessert. It’s best enjoyed in moderation, particularly if you’re watching your caloric intake.
High in Saturated Fat
This dessert contains significant amounts of saturated fat due to the heavy whipping cream, sweetened condensed milk, and ice cream. Consuming high levels of saturated fat regularly can increase the risk of heart disease.
Sugar Content
With a high sugar content, this cake is a sweet treat that should be consumed sparingly, especially for individuals managing blood sugar levels or those with diabetes.
Allergens
- Dairy: This recipe includes dairy products like heavy whipping cream, sweetened condensed milk, and ice cream. It is not suitable for those with lactose intolerance or dairy allergies.
- Gluten: Oreo cookies contain wheat, making this cake unsuitable for individuals with gluten intolerance or celiac disease. Gluten-free Oreo alternatives can be used to make the recipe gluten-free.
- Soy and Other Allergens: Some commercial ice creams and Oreos may contain soy and other common allergens. Check ingredient labels if you have specific food allergies.
Dietary Modifications
Dairy-Free Option
To make a dairy-free version, use dairy-free alternatives:
- Substitute heavy whipping cream with coconut cream or a dairy-free whipping cream.
- Use sweetened condensed coconut milk instead of traditional sweetened condensed milk.
- Choose dairy-free vanilla ice cream.
Gluten-Free Option
For a gluten-free cake, replace regular Oreos with gluten-free Oreos, which are available in many grocery stores.
Lower-Calorie Option
To reduce calories:
- Use a light or sugar-free ice cream.
- Reduce the amount of sweetened condensed milk or use a lower-calorie alternative.
- Opt for reduced-fat Oreos or similar cookies.
By considering these nutritional facts and dietary adjustments, you can better enjoy your Oreo Ice Cream Cake while aligning it with your dietary needs and preferences.
Tips for Perfect Oreo Ice Cream Cake
Here are some tips to help you achieve the perfect Oreo Ice Cream Cake:
Choose High-Quality Cotton Candies Flavoring:
- Look for reputable brands or suppliers that offer high-quality cotton candies flavoring or extract. This ensures an authentic cotton candy taste in your ice creams.
Adjust Sweetness Appropriately:
- Cotton candy flavoring can be quite sweet on its own, so adjust the amount of sugar in your ice cream base accordingly. Taste the mixture as you go and add sugar gradually to achieve the right balance of sweetness without making it overly sugary.
Use Proper Churning Techniques:
- Follow the instructions of your ice cream maker for churning the ice cream. Churning helps incorporate air into the mixture, resulting in a smooth and creamy texture. Avoid over-churning, as it can lead to a denser texture.
Store and Serve Correctly:
- Once the ice cream is churned and ready, transfer it to a freezer-safe container and freeze for a few hours or until firm.
- When serving, let the ice cream sit at room temperature for a few minutes to soften slightly for easier scooping.
- Garnish the ice cream with cotton candies pieces, colorful sprinkles, or even a drizzle of melted cotton candy for an extra touch of whimsy.
By following these tips, you can create Cotton Candy Ice Creams that captures the nostalgic flavor and vibrant colors of traditional cotton candy while ensuring a delightful texture and taste experience for your dessert indulgence.
FAQ
Can I make this cake ahead of time?
Yes, you can definitely make the Oreo Ice Cream Cake ahead of time. In fact, it’s often recommended to prepare it in advance to allow enough time for it to freeze and set properly. Making the cake ahead of time also helps to streamline your preparation if you’re planning for a special occasion or gathering.
To make the cake ahead of time:
- Follow the recipe instructions to assemble the cake layers in the springform pan.
- Once assembled, cover the cake tightly with plastic wrap or aluminum foil to prevent freezer burn and to maintain its freshness.
- Place the covered cake in the freezer and allow it to freeze for at least 4 hours, but preferably overnight.
By making the Oreo Ice Cream Cake ahead of time, you can ensure that it has enough time to firm up and develop its flavors. This also gives you the convenience of having a ready-to-serve dessert whenever you need it, making hosting and entertaining easier. Just remember to remove the cake from the freezer a few minutes before serving to allow it to soften slightly for easier slicing and serving.
How do I store leftovers of the Oreo Ice Cream Cake?
To store leftovers of the Oreo Ice Cream Cake and maintain their freshness and texture, follow these steps:
- Cover Properly: After serving, cover any remaining cake slices or the whole cake (if still intact) with plastic wrap or aluminum foil. Ensure that the wrap is pressed directly against the surface of the cake to prevent freezer burn and the formation of ice crystals.
- Use an Airtight Container: If you prefer, you can transfer the leftover cake slices to an airtight container instead of using plastic wrap. Make sure the container is freezer-safe and has a tight-sealing lid to maintain freshness.
- Label and Date: If you’re storing the cake for an extended period, it’s helpful to label the container or wrap with the date of preparation. This way, you can keep track of how long the cake has been in the freezer.
- Freeze Immediately: Place the wrapped or containerized cake in the freezer as soon as possible after serving. This helps preserve its flavor and texture.
- Keep in Freezer: Store the cake in the coldest part of your freezer to maintain its quality. Avoid placing it near the freezer door where temperature fluctuations can occur.
- Consume Within Timeframe: While the Oreo Ice Cream Cake can generally be kept in the freezer for up to a week without significant quality loss, it’s best to consume it within a few days for the freshest taste and texture.
By following these storage guidelines, you can enjoy delicious leftover slices of Oreo Ice Cream Cake whenever you crave a sweet treat
Can I use different flavors of ice cream for this recipe?
Yes, you can absolutely use different flavors of ice cream for the Oreo Ice Cream Cake recipe. In fact, experimenting with different ice cream flavors can add exciting variations and personal touches to the dessert. Here are some ideas for using different ice cream flavors:
- Mint Chocolate Chip Ice Cream: Substitute vanilla ice cream with mint chocolate chip ice cream for a refreshing and minty twist. The combination of mint and chocolate with the Oreo cookies is delightful.
- Cookies and Cream Ice Cream: If you love Oreos, using cookies and cream ice cream can enhance the Oreo flavor profile even more. It’s like having double the Oreos in every bite!
- Chocolate Ice Cream: For chocolate lovers, chocolate ice cream adds an extra layer of rich flavor. You can use chocolate ice cream in combination with vanilla or on its own for a chocolaty indulgence.
- Strawberry or Raspberry Ripple Ice Cream: Fruit-flavored ice creams like strawberry or raspberry ripple can add a fruity and refreshing element to the cake. The fruity flavors pair well with the chocolatey Oreos.
- Peanut Butter Ice Cream: If you’re a fan of peanut butter and chocolate, consider using peanut butter ice cream. It creates a delicious peanut butter cup-inspired cake that’s sure to be a hit.
- Caramel Swirl Ice Cream: Caramel lovers can opt for caramel swirl ice cream to add a sweet and gooey caramel layer to the cake. It complements the chocolate and Oreos beautifully.
Feel free to get creative and mix and match ice cream flavors according to your taste preferences. You can even create layered cakes with different ice cream flavors for a visually appealing presentation. Just ensure that the ice cream you choose has a similar consistency to vanilla ice cream, so it’s easy to work with in the recipe.
How long can I keep the Oreo Ice Cream Cake in the freezer?
You can keep the Oreo Ice Cream Cake in the freezer for up to one week without significant loss of quality. Properly stored in an airtight container or tightly wrapped with plastic wrap or aluminum foil, the cake should maintain its freshness and taste well within this timeframe.
However, it’s essential to note that the longer the cake stays in the freezer, the higher the chance of it developing freezer burn or absorbing odors from other foods in the freezer. Therefore, it’s generally recommended to consume the cake within a few days to a week for the best taste and texture.
If you plan to keep the cake longer than a week, consider double-wrapping it with plastic wrap and aluminum foil to minimize the risk of freezer burn. Labeling the container or wrap with the date of preparation can also help you keep track of how long the cake has been stored.
Before serving any leftover slices of the cake, allow them to thaw slightly at room temperature for a few minutes to soften. This makes it easier to cut clean slices without the ice cream being too hard.
Can I make this cake without a springform pan?
Yes, you can make the Oreo Ice Cream Cake without a springform pan, although using a springform pan makes it easier to remove the cake and create clean slices. If you don’t have a springform pan, you can use a regular cake pan as an alternative.
Here’s how to make the cake without a springform pan:
- Line the Pan: Line a regular cake pan with parchment paper, leaving some overhang on the sides. This overhang will act as handles to lift the cake out of the pan later.
- Prepare the Crust: Follow the recipe instructions to prepare the Oreo crust mixture. Press the crust mixture firmly and evenly into the bottom of the lined cake pan.
- Layer the Ice Cream: Spread the softened ice cream mixture evenly over the Oreo crust in the cake pan. Add any additional layers or mix-ins as desired, following the recipe instructions.
- Cover and Freeze: Cover the cake pan with plastic wrap or aluminum foil to protect the cake while it freezes. Place the cake pan in the freezer and allow the cake to freeze for at least 4 hours, or preferably overnight, until it is firm.
- Remove from Pan: Once the cake is frozen and set, use the parchment paper overhang to lift the cake out of the pan. Peel away the parchment paper from the sides of the cake.
- Slice and Serve: Place the cake on a serving platter and use a sharp knife dipped in hot water to slice the cake into clean portions. Allow the cake to thaw slightly at room temperature for a few minutes before serving for easier slicing.
While using a springform pan is convenient for releasing the cake, lining a regular cake pan with parchment paper allows you to achieve similar results and enjoy your homemade Oreo Ice Cream Cake without any special equipment.